I want to say thanks againfor the great experience of the Woodworking Essentials Class. My wife insists that I make a matching table. I recall you had a jig for starting The dovetail joints in the drawer front and the top of the legs. Could you please provide a few details on the jig so that I can duplicate it?
By the way I ordered the Tambor Door Bit set. I intend to try the Bread Box project. I am looking forward to The Turning Class later this year.
-Bill N.
Kingsport, TN
Our Expert
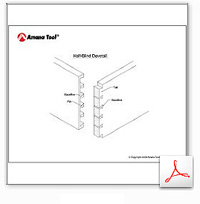
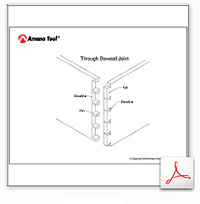
Many woodworkers choose through dovetails over half-blind dovetails
because half-blinddovetails are more time-consuming to cut;
all the waste from between each pin must be laboriously chopped by hand with a chisel and mallet. But there are times, such as in drawer construction, when a half-blind dovetail is the best option. Unlike a through dovetail, the half-blind dovetail is revealed on only one face; this makes it thebest choice for drawer fronts andfinecasework. Half-blind dovetails simply have a cleaner appearance because, unlike a through dovetail, theylack thedistracting row of rectangles (the ends of the tails are hidden from view).
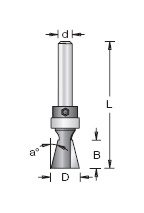
When cutting half-blind dovetails by hand, I avoid most of the labor-intensive chopping by first routing the space between the pins with the Amana Tool no.45852 dovetail bit and a shop-made jig.The bit has a guide bearing on the shank which follows the "fingers" on the jig.
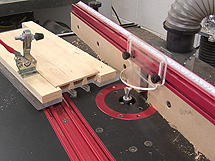 The work is trapped in the jig on three sides and I secure the work in thjig from the top with a toggle clamp.
Notice in the photograph that I use the fence on the router table when routing the pins. Although the fence does not guide the cut, it provides a place to mount the guard as well as a port for dust collection. Also, for safety reasons, always rout from right to left against the bit rotation
After routing I square the inside corners between the pins by chopping with a chisel and mallet. Then I mark the tails from the pins and saw the tails by hand in the usual way. The result is joint with all the features of a hand-cut dovetail, yet with considerably less time and effort. When making the jig, I first layout the pins to create the size and spacing that I desire.
Then I mark the location of each finger on the jig using thepin board to guide me. Keep in mind that each finger must be at least 1/4" wide to pr
event breakage. In order to make narrow pins (which are one of the signatures of hand-cut dovetails), I make the jig wider than the stock. After routing, I reposition the stock in the jig and route the board a second time. A strip of wood placed in the jig next to the stock fills the void during routing and prevents the workpiece from shifting sideways.