I am in the process of making a significant number of semi-circular window casings out of pine. I intend to use four pieces of stock which will be joined end-to-end with ship-lap joints. After glue-up, I need to cut an accurate half-round shape with an inside radius of 36". The casing width is 3-1/2". Afterwards, I'll shape the molding prfile with a Williams and Hussey molder. How do I cut an accurate radius on both the inside and outside edges of the casing?.
Also, I have purchased quite a few Amana router bits over the past two years. Many have your picture on the plastic case and I was wondering if they have any collector value like my baseball card collection?
-Rex M.
BELLEFONTE, PA
Our Expert
 The molder is a great tool for shaping curved window casing; the process is efficient and, from the standpoint of safety, the knives are completely enclosed by the machine. A factory-made accessory jig is used to keep the curved molding in a "perpendicular" path in relation to the cutterhead.
Before shaping the molding profile, the stock is bandsawed to create the curve. The rollers on the jig require a smooth surface; any irregularities in the bandsawn edge of the curved molding will be transferred to the profile.
When making curved molding for furniture or architecture, I first take a few minutes to make a template. Then I use the template to flush-trim each piece of molding stock before shaping the profile. This method works well whether you're using a molder, shaper, or table-mounted router to shape the profile because it provides a smooth, "fair" curve to ride against the jig that guides the stock during shaping.
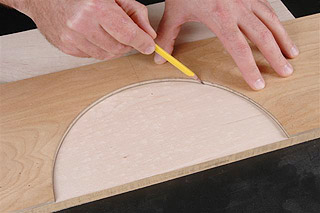
When making semi-circular molding such as window casing, I begin by using trammels on a stick to mark both the inside and outside radii of the molding onto the template stock. If you don't have a pair of trammels then a nail and pencil on a wooden stick works just as well. I would avoid using a string, however. The string may stretch and prevent you from drawing an accurate curve.
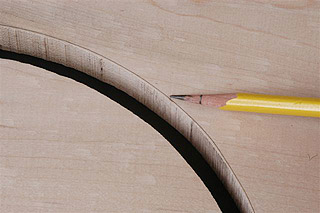 After layout, I carefully bandsaw the template to the lines. When sawing curves, I prefer the widest possible bandsaw blade because it is much easier to cut a smooth curve. For a 36" radius I suggest a 1/2" or even 3/4" wide bandsaw blade. Afterwards, I smooth the edges of the template by filing and/or sanding. It's important to take a few minutes and make the curves of the template perfect because the curves will be transferred directly to the workpiece when flush-trimming.
With the template cut out and smoothed you're ready for the next step. First trace the curves of the template directly to the workpiece. Then carefully bandsaw the curves staying about 1/16" outside the lines.
Now you're ready for flush-trimming. Keep in mind that flush-trimming curved stock is more of a challenge than straight stock; the grain changes direction at the apex of the curve. So to avoid tear-out it's important to cut "downhill" in the direction of the grain. To avoid going against the grain and creating a torn surface I suggest that you use the Amana Down-Shear Multi-Trimmer. This unique flush-trim bit has guide bearings on the end as well as on the shank which allow you to invert the workpiece and shape with the grain--without having to reposition the template.
 And as for the plastic storage boxes, they work best at protecting the bits. For collector value, I'd hold on to the baseball cards.
