Constructing a Arched Cabinet Door
If you’re constructing new cabinets for your kitchen you may have been attracted to the arched doors that are so popular today but intimidated by the seeming complexity of the design. Yet constructing arched doors is really not complicated; it’s just a process of shaping the curved top rail and door panel against the guide bearing on the router bits. But before turning on the router it’s important to take a few minutes to work out the design details.
Arguably the most important aspect of furniture and cabinet design is proportion. Many woodworkers don’t enjoy the design aspect of the woodworking process because they don’t think of themselves as being artistic. However, everyone has an eye for proportion; we’ve all viewed a chest-of-drawers with big feet or crown molding that was too small to fit the scale of the piece. Disproportionate furniture and cabinets appear unsettling. So when designing a door with an arch don’t be afraid to trust your eye. The key is to draw the door full size on a piece of thin plywood or poster board.
Arguably the most important aspect of furniture and cabinet design is proportion. Many woodworkers don’t enjoy the design aspect of the woodworking process because they don’t think of themselves as being artistic. However, everyone has an eye for proportion; we’ve all viewed a chest-of-drawers with big feet or crown molding that was too small to fit the scale of the piece. Disproportionate furniture and cabinets appear unsettling. So when designing a door with an arch don’t be afraid to trust your eye. The key is to draw the door full size on a piece of thin plywood or poster board.


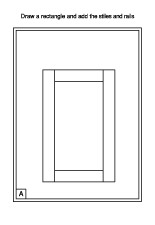
Start by drawing a rectangle that represents the height and width of the door. Next, add the stiles and rails (drawing A).

The top rail of a door usually looks best if it’s the same width of the stiles. Once the stiles and rails are drawn in just add the arch. I used a circle with a diameter to match the door height (drawing B).


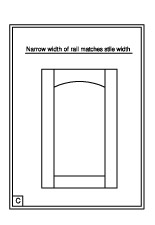
Keep in mind that the arch will probably be most pleasing to your sense of proportion if the narrow portion of the arch matches the width of the stiles (drawing C).

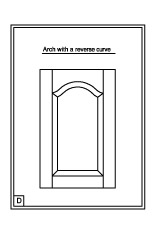
The arch can be a simple radius like I’ve created for this article or an arch with a reverse curve (drawing D).

If you’d like to pull out all of the stops you can create a classic tombstone arch (photo 2).

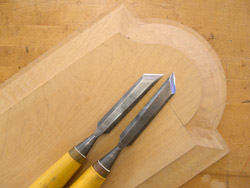
However, keep in mind that the inside corners of the panel must be carved by hand; as router bits spin they create a curve on inside corners (photo 3).

The classic arched panel door is very labor-intensive to construct and so you may want to reserve this design for a piece of fine furniture that features just one or two panels. Once you’ve drawn the door frame add the panel (drawing E).
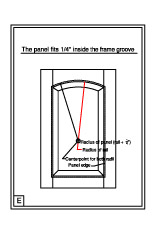

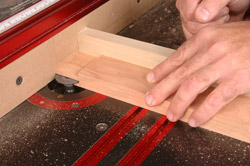
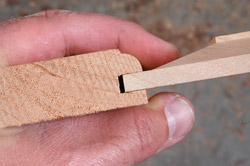
This is quite simple; the panel edge slips into the groove in the door frame 1/4". So just add 1/4" all around the inside perimeter of the frame. Keep in mind that you’ll need to add 1/4" to the radius of the top rail to create the top edge of the panel. For example, the top rail of the door in this article has an 11” radius; the top edge of the panel has an 11-1/4” radius. Both radii share a common center point. With the full-scale drawing complete you’re ready to cut the frame parts to size and cut the joints. Don’t cut the arch in the top rail until you’ve cut the joints on the ends; you’ll need the straight edge as a reference surface (photo 4).

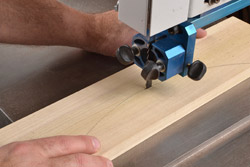
When cutting the joints you can use a two-piece stile-and-rail set such as the Amana number 55421 or if you prefer an extended tenon you can choose the Amana number 47515 (photo 5).

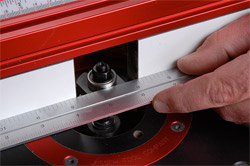
Once the frame joints are cut on the rail ends your next step is to shape the inside edges of the frame members. But first saw the arch in the top rail and smooth the surface. As you smooth the surface of the arch keep in mind that the guide bearing of the router bit will roll along this surface so it’s important that there are no bumps or irregularities. Now shape the inside edges of the stiles and rails. Shaping the stiles and bottom rail is straightforward; just secure the fence to the router table so that it is tangent to the guide bearing on the router bit (photo 6).

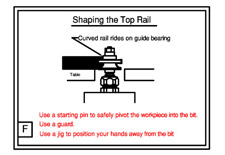
When shaping the arched top rail use push blocks or a jig to position your hands a safe distance from the spinning bit. Because the fence cannot be used to guide the workpiece it’s important to use a starting pin as a fulcrum to pivot the arched rail into the bit (drawing F).

Now dry-assemble the frame and measure for the height and width of the door panel. Typically the panel fits 1/4" into the frame groove and “floats” as it expands and contracts from summer to winter (photo 7).

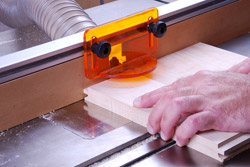
After ripping the panel to width, square the lower end and draw the arch at the top. Then saw the arch and smooth the surface as you did on the top rail. It’s important to use a guard with all router bits but especially so with raised panel bits (photo 8).


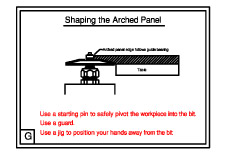
These tools are large and, as with all router bits, it’s important to keep them shielded from your hands. When shaping the arch, pivot the workpiece into the bit and allow the guide bearing to roll along the curve (drawing G).
Now you’re ready to smooth the parts and assemble the door. It’s exciting to see it all come together as planned.