Routing with Templates

Triangular Cabinet

I have painstakingly drawn up designs and planed a bunch of solid walnut for a small triangular shaped cabinet.  The design calls for a cabinet with 60 degree mitered edges, and shelves made from joining three boards end to end on 60 degree angles.  This should result in a triangular shaped cabinet with triangular shelves.  Unfortunately, my table saw only adjusts to 45 degrees, and that's how I had intended to cut the 60 degree edges for the cabinet.  And, my miter saw stops at 57 degrees, so I don't know how to cut the shelf boards.  I found a 60 degree chamfer router bit form Amana (I couldn't find any other manufacturer that makes one), so that should let me cut the cabinet edges, but I still don't know how to make the shelves.  Do miter saws typically adjust to 60 degrees?  Is there a manual way to make these cuts precisely?

-Brian D. 
Shalimar, FL

Our Expert

When making a corner cabinet I fit the interior with triangular shaped shelves. To insure that all of the shelves are identical and that they fit the cabinet precisely I use a technique called template routing. 

To make the template I draw the shape of the triangular shelf full-size on 1/2" plywood. Next, I cut out the template on the bandsaw and follow the line carefully. Afterwards, I smooth the edges of the template by flush trimming with Amana Tool no.47101. I position a length of 1"x3" along the layout line and clamp it in place as a guide for the flush-trim bit.

To use the template I fasten it to the underside of the shelf stock with small brads. Be sure to locate the brads a few inches away from the edge of the stock. Although the small brad holes will not show on the finished
product you may prefer to use double-stick tape. I use cloth woodturner's tape because it has much greater holding power than ordinary carpet tape.

Before routing I trace the template onto the stock and bandsaw within 1/16" of the layout line. To shape the shelf I follow the edges of the template with the flush trim bit. 

Gooseneck Molding

I am going to be building a tiger maple highboy this spring and I need a shaper cutter for making a gooseneck molding. Do you have any suggestions?

-Brad C.
Whitefish, MT

Our Expert


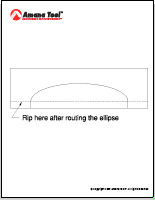
Making a gooseneck molding for one highboy with a shaper cutter is very expensive. The gooseneck molding shaper cutters that I use are custom made and the cost is prohibit

ive for one just piece of furniture. In fact, this is true with any large furniture molding, straight or curve

d. A much more economical method for shaping large furniture moldings is to make a series of small cuts with individual router bits.


All complex moldings, such as a furniture crown molding, are simple profiles that are combined to make a large, dramatic profile. For example, the typical gooseneck molding is comprised of a large cove which is flanked by smaller profiles such as the ogee, roundover,etc. 


I begin by making a full-scale drawing of the molding. I've found that this is the best way to ensure that the molding is proportional to the casework. As I draw the molding, I use the router bit profiles to guide me. For example, Amana makes a complete assortment of core box bits for shaping the cove. For shaping a gooseneck molding you'll find the large bits such as Amana Tool Core Box Router Bits no.45946, 45948, and 45949 to be most useful. After shaping the cove, I shape  the smaller profiles such as Amana Tool Ogee Router Bits no.54126 or 54124. To use these bits for a gooseneck you'll first need to remove the guide bearing. A roundover can be shaped with Amana Tool Round Under Router Bits no.57138, 57140 or 57145. Although these unusual "roundunder" bits are designed to shape solid surface countertops, you can see from the drawing that they are just what is needed for shaping a gooseneck molding.


Once I've made the drawing I bandsaw the gooseneck curve from a wide, thick plank. At this time I saw only the inside of the curve. This method provides plenty of extra stock behind the profile for attaching the workpiece to a template jig. The jig is made of 3/4" plywood which on which the ogee curve is sawn. You'll need to construct two jigs, a right and a left. As you can see from the photo, the jig is equipped with handles to ensure a solid grip as you feed the stock. I fasten the workpiece to the jig with screws that are positioned in the waste area, out of the path of the spinning bits.

An important part of the set-up is the over-arm guide which is fastened to the edge of the router table. The end of the arm has a guide bearing which follows the curve of the jig and guides the cut. The arm is adjustable on the base which provides a way to control the cutting depth.


With the set-up complete I begin by flush trimming the bandsawn curve of the workpiece to the curve of the jig with Amana Tool 
Extra Long Flush Trim no. 47126-2
. Then I shape the large cove with a series of small cuts. Afterwards, I shape the smaller profiles which flank the cove. The last step is to bandsaw the outside edge of the ogee curve. 

View illustration of Gooseneck Molding

Routing with templates?

How can I use smaller templates on a table router without it grabbing the wood, or my fingers?

- Greg 
Breckenridge, MN

Our Expert


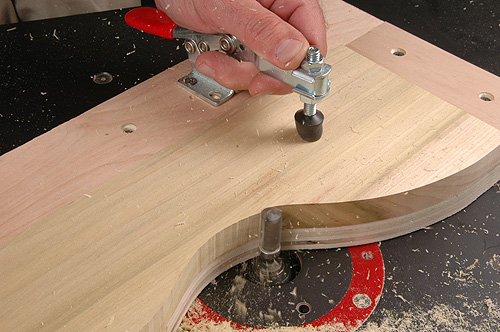
Routing with a guide template is one of the fastest and most accurate  methods for creating multiple parts. As the guide bearing follows the template, the bit creates the shape 

on the workpiece. Templates can be used for flush trimming complex parts before assembly, shaping a profile along a curved edge, or even shaping rabbets, dovetails and grooves for joints. The key is simply to have an accurate template and a router bit equipped with a guide bearing.

Many profile bits, such as Amana no.51567 bullnose, shape away the entire edge of the workpiece and so a template is necessary if this type of bit is used on curved stock. Flush trim template bits, such as Amana no.45487, have a shank-mounted guide bearing and are specially designed for flush trimming with a template. The Amana Tool Down-Shear Multi-Trimmer no.47096 has two guide bearings, one on the shank and a second on the end of the bit. This unique design allows you to always cut "downhill" with the grain and avoid tearout.

To prevent the router bit from grabbing the workpiece it's important to minimize the amount of stock being removed. For example, if the workpiece is curved, I use a bandsaw to first cut within 1/16" of the finished surface. Large profiles can be shaped in multiple passes by starting with a large diameter guide bearing and reducing the bearing diameter for subsequent cuts.

Also, in order to prevent the bit from grabbing the workpiece at the start of the cut, I extend the template beyond the workpiece. This way the guide bearing makes contact with the template before the spinning bit contacts the stock.

The workpiece should always be securely fastened to the template to ensure safety and an accurate cut. The easiest method is to just use small brads or screws as long as they can be positioned out of the path of the bit. Brads work well for light cuts with small bits. However, if the holes left by brads or screws will be visible in the finished workpiece, I use toggle clamps or double-sided cloth tape. Cloth tape has tremendous holding power and it's a good choice when the cutting path follows the entire perimeter of the stock. Cloth double-sided tape is pressure sensitive and so it's important to apply momentary pressure with a clamp before routing. Also, if the profile is large and the cut is heavy, I always opt for screws and/or toggle clamps.

The plastic push blocks sold for jointers make excellent handles for a template; just drill a couple of holes in the push block and fasten it to the template with screws. When using toggle clamps, I'll often just use the clamps to grasp the template. However, if the cut is large and the workpiece is small, I'll make the base of the template large enough to add handles and I'll position the handles a safe distance away from the cutting action.

The photo illustrates a template-guided flush-trim cut using Amana no.45460 Flush Trim Template bit. The template extends beyond the workpiece for a smooth start. Toggle clamps hold the workpiece in position and blocks align the workpiece to the jig and counteract the force of the bit as it cuts. I use a guard that mounts to the table and covers the bit. In this photo the guard has been removed so that you can view the cutting action and guide bearing.

Cabinet Doors

I need to cut a 1/4" rabbet in the back of a solid wood cabinet door to accept a glass pane. The front of the door is solid wood. We want to change the look of the front of the door. What type of router bit should I use.

-Mike
Bartlesville, OK

Our Expert


To cut a recess for glass you could use a straight bit 45418 and a template. To guide the router along the template edge use a bushing attached to the router sub-base.


Templates?

In your article you touched briefly on a subject to plagues me every time I try to use a template. Recently I routed a base plate for a cabinet. The plate consisted of a large arc with small radii ( 1/2" radius) at the ends of the arc. To route the edge, I used a 1/2" diameter 1" long flush cut router bit. One end came out perfectly, but when routing the other radius the router bit always grabbed and split the part. It didn't seem to make any difference which way I moved the router i.e. from the large arc into the radius or the opposite direction into the radius first. I should also point out that I was only removing from 1/16" to 1/8" (closer to 1/16"). I had used my band saw to cut close to the pattern line. The surface was somewhat ragged because the band saw won't cut that tight a radius. I believe my problem is referred to as "climb routing".

My question of course is how do I avoid the router bit grabbing and splitting the part. And, of course there is the safety issue when the part is thrown half way across the shop.

-Joseph R.
Hemet, CA

Our Expert


When routing end grain the trailing edge will splinter or "blowout" as the bit exits the work. When routing around the perimeter of a board the solution is to start with an end; as you work aro

und the perimeter of the board the splinters will shape away as you route the long-grain edges. When this is not possible, as in your situation with the arch, I rip the piece oversized when milling. After routing, I rip the workpiece to final width which removes the splintered surface.

You're taking the right step by bandsawing close to the final surface. When template ro

uting I first saw the stock to within 1/16". This limits the amount of the stock to removed by the router and limits the possibility of having the router bit grab the workpiece. If your bandsaw blade is too wide for the small radius I suggest that you remove a little more stock in this area first with a rat-tail file.

Finally, for the smoothest possible surface I use a spiral flush-trim bit such as the Amana "Ultratrim".

Cheese Board

I have made a cheese board out of Jarrah. I want to put a small bowl into the cheese board but I dont want to cut a hole all the way through the
board. The board is 2" thick   I only want to cut a circle to fit the bowl into.  Simular to the groove in the base of a saucer but deeper The circle  need to cut would be as follows: Depth 1-1/4", Width  3"

What tool would I use?

-Janeene
Perth Western Australia - Australia

Our Expert

Mortising Bit #45563 would be perfect for this job. This bit is specially designed to make smooth, flat-bottomed cuts. The bit comes equipped with a shank mounted guide bearing for guiding the cut with a template.

Prototype dining room chairs

I was wondering if you could advise me as to whether or not I could use Amana # SC632 shaper cutter on my old Rockwell Shaper.  It's the lighter duty one with a 1/2" spindle.  I'd like to do pattern shaping for a set of chairs.  I've done single chairs with bandsaw, planes, and spokeshave but a set would be a different ball game.  I saw once where Amana had a straight, spiral cutter which would minimize  tear out but don't know about the size limitations.  Your advice would be appreciated, you've helped me out before. I do have your Shaper Book and I see where you recommend a 3/4 spindle for heavy duty work but that's not in the budget!  Thanks in advance.

-John E.
Las Vegas, NV

Our Expert


Template shaping is an efficient method for smoothing the curves of the chair legs. However, doubt that your 1/2" shaper has the power for such a tall cutter. Instead, I recommend the Amana Down-Shear Multi Trimmer. Tool no. 47094 has the required 2" cutting surface for the chair legs and the down-shear cutting action creates an incredibly smooth surface.


Window Sills

I like the look of your table edge router bit named the reverse curve. I would like to use it on a router table to make my window sills. What is the purpose of a bearing on this bit if it is designed to be used on 3/4" material? What would guide the bearing?  I am a novice woodworker and I am puzzled.
Thanks, 


-Don

Shickshinny, PA 

Our Expert

The bearing on a profile bit, such as Amana Tool reverse curve bit no.49555, serves two purposes: if you're shaping a tabletop with straight sides, the guide bearing is used to easily position the fence on the router table. Depending upon the horsepower of the router and the hardness of the stock I'll often shape the profile in several passes. For the final pass, I use a  straightedge and position the fence tangent to the guide bearing.


If you're shaping a tabletop (or window sill) with a curved edge the guide bearing is used to follow a template which guides the cut. First a template is made of plywood. The template may be an arc, ellipse, or a freeform curve. The curve of the template is then traced onto the workpiece and the work is band sawn to the layout line. Afterward sawing the curve, the template is fastened to the work with screws or double-stick tape. During shaping, the guide bearing follows the template and the cutting portion of the bit shapes the profile along the curved edge of the work.

Prototype for Counter Stools

I'd like to ask your advice on pattern shaping.  I have your shaper book and have done pattern shaping with my router.  It just seems the shaper is more suited even though what I have is an old Rockwell, 1hp, with a 1/2" spindle.  The spindle is about 3-1/2" long and what I'm wondering is if this is sufficient?  Is it best to use a 2" rabbet cutter and then pair that up with a bearing to follow the pattern?  With a router, I run into the problem of grain tear out, would the shaper minimize that due to its slower speed? Last of all, is there a shaper cutter better suited to pattern shaping than the rabbet cutter?   Thanks for all your advice.


-John

Las Vegas, NV

Our Expert

Although the problem of tearout can sometimes be reduced with a slower speed, there are other factors, such as cuttingdepth, grain direction, and the cutting angle of the tool, that play a larger role.


When using any cutting tool you'll experience less tearout by taking two or more smaller cuts rather than one heavy cut. This is also true when using a shaper or router. When using a template and guide bearing to shape a profile on curved stock you can lighten the cut by using a larger guide bearing for the initial pass. Then switch to a smaller guide bearing to complete the cut. If you are simply flush trimming curved stock you can lighten the cut (and minimize tearout and cutting resistance) by first bandsawing very close to the layout line. This reduces the amount of stock to be removed by the router or shaper to a minimum.


However, depending on the grain and the type of wood you may still have small amounts of tearout that are not acceptable in fine work. Amana has developed several tools that address the problem of tearout when flush-trimming curved stock. Let's take a closer look.


When flush trimming curved stock you'll get the smoothest cut with a spiral cutter such as the Amana Spiral Shaper Cutter no.61292.


This shaper cutter uses carbide knives which are mounted to the cutter in a spiral pattern. The carbide is long-wearing and the spiral pattern provides a phenomenal, glass-smooth surface. I've used this cutter a number of times for template shaping and I've been very pleased with the results, to say the least.

However, this cutter has a 1-1/4" bore that I bush down to fit the 1" spindle on my shaper. And I don't recommend that you bush it down to fit a 1/2" spindle shaper; that is just to much load on such a small machine.


As I'm sure that you know, you'll get better results when jointing or planing stock if you cut in the direction of the grain. This also holds true when using a router or shaper to flush-trim a curved surface.


You can use this technique with the Amana Down-shear Multi Trimmer no.47097. This unique flush-trimming router bit has guide bearings at both ends. You can cut from either direction using only one template and without moving the template to the other side of the workpiece.


Another option is to use the Amana Ultratrim Spiral Trim bit. This tool also produces glass-smooth cuts and the extralong two-inch cutting length is enough to cut the thick stock that you're working. Spiral router bits are available in "up-cut" or "down-cut" configurations. Because I prefer to use a router table when flush trimming, I use the "up-cut" bit no.46304. The cutting action of this bit is safest when using a router table because it pulls the stock downward toward the table.


Finally, whatever tools that you choose to use for flush-trimming curved stock, remember to keep safety at the forefront. Use a guard to provide a barrier between your hands and the cutter. And position your hands a safe distance from the cutting actions.

© 2021 Amana Tool Corporation