
In using the sc430 shaper cutters to make wainscot, I'm having trouble aligning the mating cuts. Any suggestions?
-Ben
Whitehall, MI
In using the sc430 shaper cutters to make wainscot, I'm having trouble aligning the mating cuts. Any suggestions?
-Ben
Whitehall, MI
Our Expert

This joint is essentially a mitered spline joint which can easily be cut with an Amana Prestige saw blade and a tenon jig on the tablesaw. The groove for the adjoinin
g spline is cut with the stock on end and supported by the jig. As you can see in the drawing the jig rides along the fence and the fence keeps
the jig and workpiece on a linear path.
The miter is cut on the tablesaw with the blade height adjusted to create the shoulder of the spline.
These are common frames artists to strech their canvas on. It is a floating hardwood angled tongue and groove joint. It's a little more complicated than that. They use "keys" to tighten the canvas, in time the canvas tends to loosen and sag. They interlock with no glue or fasteners.
-Joe
Maitland, FL
Our Expert
This joint is essentially a mitered spline joint which can easily be cut with an Amana Prestige saw blade and a tenon jig on the tablesaw. The groove for the adjoinin
g spline is cut with the stock on end and supported by the jig. As you can see in the drawing the jig rides along the fence and the fence keeps
the jig and workpiece on a linear path.
The miter is cut on the tablesaw with the blade height adjusted to create the shoulder of the spline.
I am not sure how to construct the runners for drawers. It will be a five drawer chest. the sides will be made from 3" boards and 1/4" inserts. I want it to be a shaker looking chest. Your help is appreciated.
-Carino
Pearland, TX
Our Expert

The drawer runners can be fastened into a shallow groove in the sides of the case. The front of the runner can be joined to the drawer divider with a mortise-and-tenon joint.
For greater strength of the case and the runners, a second drawer divider can be fit into the back of the case and the runners joined to it as well. The two dividers and two runners joined with a mortise-and-tenon create a web type framework to add rigidity to the case.
To cut the sliding dovetail that joins the divider to the case I recommend the Amana dovetail bit no.45852. The upper ball bearing will allow you to use a jig to guide the router.
To joint the spruce slats I would like to try a tongue and groove method to get better alignment and more glue surface area. The project is 8mm thick. The edges of the completed soundboard are tapered from 8mm to 5mm sanding on only one side beginning about 8 inches from the edge of the soundboard. To allow this amount of sanding the tongue part has to be about 4mm below the face of the board. I figure a 1/16th to 3/32 tongue is all that is needed but instead of the typical T&G where the tongue is centered, it will have to be offset to allow the 4mm top thickness. Do you know of such a bit set or can you direct me to have one custom made? Thank you.
-Tom Z.
Walker, IA
Our Expert

I suggest that you use the Amana slot cutter bit no.53300-1 to cut the 1/16" tongue and the Amana Quadraset no.53600 to cut the groove.
Like a stacking dado for the table saw, the Quadraset bit has a set of stacking cutters for the bit shank. This will allow you to achieve a perfect fit with the mating
half of the joint.
Great description of the beaded face frame process, but you did not describe the one detail I have the biggest question about. How do you get rid of the bead from the miter at the mortise to the end of the stile?
- Jim M.
North Royalton, OH
Our Expert
When making a frame with mitered sticking, after the miter is cut the excess sticking around the mortise is removed up to the point of the miter. To remove the sticking I cut away the excess with a bandsaw and smooth the sawn surface with a wide chisel.
I have just purchased your special "Face Frame" plate joiner blade. I have installed it on my Freud® plate jointer and it cuts great, how ever can you tell me where I can purchase splines that fit into its thin kerf? The standard biscuits I have do not fit this thin cut, I there a specific brand I need to purchase.
-Mike M.
Our Expert
Face frame biscuits, sometimes referred to as an "H-9", have a 3mm thickness rather than the standard thickness of 4mm. You can purchase face frame biscuits from Highland Hardware at 800-241-6748.
I am looking for a router bit that I know exists but can not find. It cuts a minute concavity into the edge of plywood to compensate for glue expansion when gluing up a solid wood edge so the joint is nearly seamless.
-Bill
Bethpage, NY
Our Expert
 Actually, the glues used most often forwoodworking, white and yellow, do not expand as they dry; so there is no need to allow room for expansion. In fact,the opposite is true. For the strongest bond, it is important that the mating surfaces in a joint make contact. This is true for every type of joint whether it is a dovetail, mortise-and-tenon, or simply a wood strip to conceal the layersin the edges of plywood.
When glue is applied it is absorbed into the cells of the wood to create abond. And the greater the surface area for glue, the stronger the joint.
Amana has two bit sets specificallyfor edge banding. Sets no.55466 and 55468 areeach designed to increase the glue surface area over an ordinary butt joint. In addition, the unique profiles on these bits ensures a perfectalignment during glue-up.
I want to say thanks againfor the great experience of the Woodworking Essentials Class. My wife insists that I make a matching table. I recall you had a jig for starting The dovetail joints in the drawer front and the top of the legs. Could you please provide a few details on the jig so that I can duplicate it?
By the way I ordered the Tambor Door Bit set. I intend to try the Bread Box project. I am looking forward to The Turning Class later this year.
-Bill N.
Kingsport, TN
Our Expert
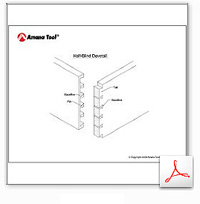
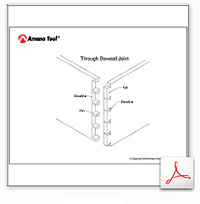
Many woodworkers choose through dovetails over half-blind dovetails
because half-blinddovetails are more time-consuming to cut;
all the waste from between each pin must be laboriously chopped by hand with a chisel and mallet. But there are times, such as in drawer construction, when a half-blind dovetail is the best option. Unlike a through dovetail, the half-blind dovetail is revealed on only one face; this makes it thebest choice for drawer fronts andfinecasework. Half-blind dovetails simply have a cleaner appearance because, unlike a through dovetail, theylack thedistracting row of rectangles (the ends of the tails are hidden from view).
When cutting half-blind dovetails by hand, I avoid most of the labor-intensive chopping by first routing the space between the pins with the Amana Tool no.45852 dovetail bit and a shop-made jig.The bit has a guide bearing on the shank which follows the "fingers" on the jig.
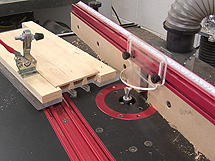 The work is trapped in the jig on three sides and I secure the work in thjig from the top with a toggle clamp.
Notice in the photograph that I use the fence on the router table when routing the pins. Although the fence does not guide the cut, it provides a place to mount the guard as well as a port for dust collection. Also, for safety reasons, always rout from right to left against the bit rotation
After routing I square the inside corners between the pins by chopping with a chisel and mallet. Then I mark the tails from the pins and saw the tails by hand in the usual way. The result is joint with all the features of a hand-cut dovetail, yet with considerably less time and effort. When making the jig, I first layout the pins to create the size and spacing that I desire.
Then I mark the location of each finger on the jig using thepin board to guide me. Keep in mind that each finger must be at least 1/4" wide to pr
event breakage. In order to make narrow pins (which are one of the signatures of hand-cut dovetails), I make the jig wider than the stock. After routing, I reposition the stock in the jig and route the board a second time. A strip of wood placed in the jig next to the stock fills the void during routing and prevents the workpiece from shifting sideways.

looking for a 1/4" bit 2-1/4" cutting depth one or two flute turning 30,000 rpms dounwerd cutting can you help. thanks
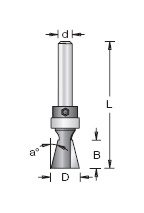
Is the RC-1028 the correct tool to use for cutting mitre joints from 3mm birch plywood?
Our Expert
Thank you for the question.
This is the correct angle tool but the RC-1028 is very large for 3mm material. The Rc-1100 has a ½” shank and would be better suited for 3mm material.
I made wine bottle boxes. Most are 3 1/2" in height, 14" long 4-1/2" wide, with stock 3/8" thick. I use miter joints, cut 45 degrees on the table saw, and assembly using rubber bands for clamps. This has worked out fine. However, I now need to fill orders (several hundred ) for larger 6 bottle boxes, measuring 4-1/2" high X 15" X 24" long. Tops and bottoms are glued, then the top is cut off and then hinged with barbed hinges. I can still use rubber bands to clamp the tops and bottoms, But not the from the sides. I was thinking using either a lock miter bit or a drawer lock bit.
Specs show thicker stock is required. Mine measures 3/8" sometimes 5/16". Using a lock miter or drawer lock seems the way to go. This would eliminate
the need for most clamping. I hire assemblers to do the assembly work. What might you suggest I use to make things easier and faster for production basis. Box joints would work except for the height (4") Would appreciate your feedback. Any mini miter lock or drawer lock bits?
Thanks
Fred I.
Coventry, RI
Our Expert
The long-grain gluing surfaces and interlocking fingers of a box joint will provide the corners with the greatest strength. The Amana Box Joint Bit no.53610 will cut stock as wide as 4" by raising the bit and making a second pass. Four inches is the limit though so if you need 4-1/2" it's not an option.
A strong and efficient method would be simply to use a tongue-and-groove joint. You could cut the groove with an Amana 1/8" straight bit no.45200 and cut the tongue with the Amana Tool Super Rabbet no.49360.
I need to make finger joints on 1 & 1/2" stock. The finger joint router bits that I can find only go to 1 & 3/8". I do have a 3 & 1/4 HP 5 speed in a lift. I do see that a small diameter shaper cutter (finger joint) is made for the thicker stock. At one time I did see a adapter available with a 1/2" shank to a 3/4" bore so I could mount the smaller shaper cutters but I've searched without any luck. Any ideas for my 1 & 1/2" stock? Thanks,
- Pete
Schiller Park, IL
Our Expert
Actually, the Amana Tool Finger Joint bit no.55392 can cut stock up to 1-3/4" thick by taking multiple passes and adjusting the bit height after the first pass. Complete instructions come with the bit showing hoe it is used. If you have other questions please contact us.
I recently built a cherry dresser. All dividers were dovetailed into the side of the case using sliding dovetails. When cutting the dovetail sockets
in the case sides, I had chipping on two of the sockets where the bit exited and entered during the cut. I ended up trimming the side of the case by
1/8" on the table saw to get rid of it. What is the best way to prevent this?
- Rex M.
Bellefonte, PA
Our Expert

Dovetails are a great way to join the dividers to the case or "box" when constructing fine furniture.
Most dividers are 7/8" thick and are joined to the case with a single sliding dovetail. I use the Amana Tool dovetail bit no.45816 to cut both the socket and the mating tail.
As you've experienced, the bit can chip the work when entering the cut. In my experience, the bit will not chip the edge if the bit is very sharp and you enter the stock slowly. However, as insurance you can always wait to rip the stock to final size after routing the sockets.
I've been using your DVD on dovetails recently to better myself at cutting dovetails. I'm plagued with the following question. You like to use 14 deg angle for most and most bit manufacturers specify their bits in width of cut and angle ie 14 deg x 1/2 inch etc. Marking gauges are usually 1:6 or 1:8 ratios which I have assumed to be the slope or tangent of the angle. Since these ratios equate to approx 9 1/2 deg and 7 deg angles, how do these tie together with mfrs bit angles? Would you please help me out here? Thanks very much. Your DVD is excellent on techniques.
- Jerry G.
Port Ludlow, WA
Our Expert
 Thank you for the compliments on my Mastering Dovetails DVD; I'm glad to hear that you're enjoying it. A dovetail joint with 14 degree angles between the tails and pins has a very pleasing appearance and the pronounced angle makes a strong joint. I lay out the joint with an inexpensive aluminum marker on which I've modified to a 14 degree angle.
To cut the pin board on a half-blind dovetail I begin by removing much of the waste with a router. I use Amana Tool no.45852 dovetail bit. This bit is 3/4" in diameter and has an upper ball bearing so that I can use the bit with a shop-made template.
I am finishing a ledge with three finished boards W-71/2, XL-8, XH-1". Will cut to length to fit onto a ledge about 18'-11" long. What would be the best way to hook the three edges together. Finger joint or rev. glue joint. Thanks for your help.
Kansas City, MO
Our Expert
From the sizes you've mentioned I doubt that a finger joint bit is long enough to reach to the center of the stock. Instead, I suggest that you use a half-lap joint. I would use a Amana Tool straight router bit such as #45448 to route a recess equal to half of the stock thickness at each end of the board. The half-lap joint will provide plenty of long-grain glue surface area to strengthen the joint.
View Detail Illustration
I'm making a small box with dovetailed corners and a sliding lid. I want to use solid wood for the bottom. What is a good way to attach the bottom?
- Bob
Marietta, GA
Our Expert
When using solid wood for the bottom of a box, as opposed to plywood, it is important to allow for seasonal expansion and contraction of the wood. In small boxes, I cut a 3/16" wide groove around the inside of the box perimeter with a 3/16" straight bit such as Amana Tool #45102. Make sure to position the groove in he tail so that the bit does not cut away the pin.Also, stop the groove before it reaches the end of the tail board to keep it hidden from view.
When fitting the bottom cut it slightly undersized to allow for expansion into the groove. As a rule-of-thumb I allow 1/16" per 12" of stock for seasonal expansion. For a small box like the one pictured I mill the bottom 3/8" thick and bevel the edges to fit the groove with Amana Tool #54116.
I just purchased the drawer lock bit #55387 and I am confused about the set up. First, should I be able to set the fence and bit height once for both the side piece cut and the front cut. If so what would that set up be? If you do need to make changes to the set up to run sides and fronts, do you have any guidelines.
I am using all 3/4 " material as the drawers are sizeable. I have tried changing settings and running some samples but feel that I am missing some piece of information as I can't get the profiles to match up for a fit.
Forgot to ask you about a suggested speed for this bit. I'm using soft maple for my drawers.
- Warren B.
Bozeman, MT
Our Expert
Making a drawer with a drawer lock router bit requires two cuts, one on the drawer front and the second on the drawer side. The bit height is the same for both cuts and must be exact for a good fit between the mating parts. The drawing provides more details.
The fence position is determined by the desired position of the side to the front. For example, you can position the fence so that, once assembled, the front and side are flush. Or you can create an offset to provide space for a side-mount slide.
The recommended max rpm is 28,000.
Some day I do hope to be able to take one or more of your classes. In the meantime I offered my wife the opportunity of letting me build her a 50" round segmented octagonal patio table. I have mitered all the segments, measured and remeasured, and used a CAD drawing template, but still when I fit the last segment it is too long and some joints not quite perfect. I know that the error is very small and accumulative, but do you have a methodology (book or article to recommend) that doesn't require CNC technology to help reduce such error accumulation or isolate a guilty segment or two? The project is a lot of fun and I'd like to build a few more for friends and family, but I'm not certain how to correct this problem. It seems like the more technology we buy and use the more traditional methods are lost to us.
-Clark
Plymouth, MA
Our Expert
Polygons can be a bit difficult; I always begin by determining the angle that is required by dividing 180 by the number of segments in the polygon. For example, 180 divided by 8 = 22.5 degrees. Next, I determine which tool to use to make the angled cut. To construct a hollow octagonal column I use a chamfer router bit, Amana Tool no.49410. This bit creates an accurate 22.5 degree bevel along the edges stock up to 13/16" in thickness. To bevel the edges of thicker stock I use the tablesaw and tilt the blade to 22.5 degrees.
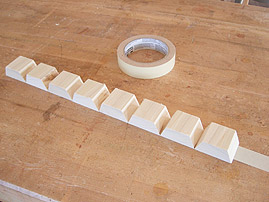
Constructing a large octagonal table top requires a 22.5 degree miter on both ends of each of the eight segments. As you've pointed out, even a small error in the angle is accumulative and will prevent the joints from fitting. Rather than trust the angle scale on the tablesaw I've found that the best solution is to test the setup with inexpensive wood such as pine or poplar.
For example, in the attached photo I beveled the edge of a poplar strip, cut the strip into eight pieces and joined them with masking tape. The assembled octagon reveals any error in the angle. And, if so, which direction.

Also, when constructing a octagonal table top if just one piece is slightly longer or shorter than the others the joints will not fit , even if the angle is correct.
To ensure that all pieces are equal in length I position each piece against a stop when making the cut.
And I would certainly enjoy having you in a class. We post our new schedule each year in September.
Could you please tell me how to cut a cope joint on crown molding?
-Devrieswouter
Richmond, B.C. Canada
Our Expert
 Moldings are typically mitered as they intersect. However, if inside corners are mitered they tend to open up and reveal an unsightly gap. When installing crown molding a better option is to cope the inside corners.
Coping a crown molding can be a bit tedious but the results are well worth it because when it is skillfully done the joint appears seamless.
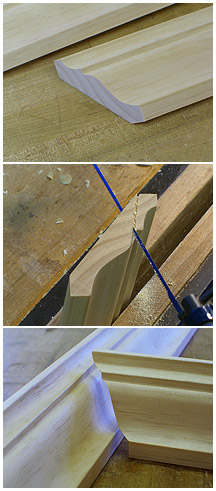
When coping a crown molding only one half of the joint is coped. The second half of the joint simply butts to the adjacent wall. To cut a smooth, tight-fitting cope begin by mitering the molding as you normally would.
Remember, when mitering crown molding the stock is positioned upside-down on the saw.
For a smooth, accurate cut the Amana Tool miter blade no MS10600 is a great choice. This blade is specially designed for creating clean, crisp cuts with a miter saw.
Once you've mitered the end of the molding you're ready to cut the cope. The miter line on the face of the molding is the layout line for the coping saw.
Secure the molding in a vise and carefully undercut the miter to create the cope. Afterwards, you may need to smooth the saw cut with a small file.
I read that you use the router without a jig to cut the half blind dovetails on the front of the drawer. Do not understand how you can control the cut. Very difficult to see what you are doing.
-Robert F.
Danville, CA
Our Expert
Using my method the router is not used to cut dovetail joints. Instead, the router is used to remove the excess stock from in between the pins so that you can more efficiently cut the joint by hand.
If you've ever cut half-blind dovetails then you're aware of the extra time involved in removing the waste from between the pins. To reduce the time spent on the process I use Amana Tool dovetail bit no.45816 to quickly cut away the excess waste.
First I lay out the joint with a marking gauge and a knife then I route to the knife lines. Although it may sound difficult it is really quite easy. The key is to use a sharp bit. A sharp dovetail bit will have little cutting resistance and with practice you can easily follow the layout lines.
After routing square the corners with a chisel(the bit leaves inside corners of the sockets rounded), mark the tails from the pins and saw them out.
Recommended Tools
Amana Tool dovetail bit no.45816