
I am currently building a chest of drawers. I want to attach the braket feet to a seperate frame to avoid cross grain construction. How do you suggest that I do this?
Moreno Valley, CA
- Michael
I am currently building a chest of drawers. I want to attach the braket feet to a seperate frame to avoid cross grain construction. How do you suggest that I do this?
Moreno Valley, CA
- Michael
Our Expert
Furniture manufacturer's probably make the drawers shorter to save materials; although there is little material saved on one chest it adds up when you consider the number of chests manufactured in a year in just one facility. Most people probably don't realize that the drawers are shorter than the case by several inches or if they do, they don't care.
Every dresser, desk, cabinet I own has drawers that lack about three or four inches of reaching the back of the piece. I don't understand why this space is wasted. I rebuilt my bathroom cabinet so the drawers go all the way back. It adds many inches of storage space. No problem.Do manufacturers actually try to save a few bucks by not making full depth drawers?
Cuba, KS
- Brian
Our Expert

Curved moldings with a simple profile are easily shaped with bearing guided router bits. First the curve is cut out with a bandsaw and carefully smoothed to remove the saw marks and irregularities. Then the profile is shaped with the guide bearing on the router bit rolling along the edge of the workpiece. To safely make this type of cut you will need a starting pin which fits into the top of the route
r table and serves as a fulcrum.
Complex profiles, such as a large cove flanked by an ogee and a roundover, generally require several router bits, a template, and an "overarm guide". You can find more details on this technique here. And "The Shaper Book" also has a photo essay with lots of details.
I am making divided light door set for china cabinet using Amana #55360. My shelves are 7/8" so I can I make my horizontal muntins 7/8" also...........adjusting the mortises appropriately.............or do I have to stick to 3/4" as it says in the direction pamphlet? 3/4" leaves an exposure facet from the 7/8 shelf which I would like not to have....
-Will
Our Expert
Traditionally speaking, the mullions on a divided light door are proportioned to fit the scale and design of the cabinet. As the scale of the cabinet increases, the mullion width increases, too.
Divided light doors have a shaped profile along the inside edges of the rails, stiles, and mullions. The profile, usually referred to as "sticking", is necessary to lighten the look of the door parts and do away with what would otherwise be a square, unattractive, corner. When designing a divided light door, as the mullion width increases the sticking width should increase, too, so that the two will appear proportional. After all, it is proportions that make any piece of furniture a success (or not).
Amana set no.55360 is designed for 3/4" wide mullions. Although you can instead make the mullions 7/8" wide, the flat portion between the sticking will appear wider and you may not like the appearance. I suggest that you first make a 7/8" wide mullion with the set to be certain that you're pleased with the look.
When reviewing drawings for fine furniture casework I've noticed that many of the parts are 7/8" thick. Do you generally count on getting this from 4/4 rough stock? Or is this too optimistic? I know it depends on the individual board, but what do you generally plan for? Thanks with any advice.
-Ken
Our Expert
As a rule-of-thumb, I always add 1/4" to the finished thickness when calculating dimensions of the rough lumber required for a furniture project. Parts that finish 7/8" require 5/4 stock since 1-1/8" rough stock is not a standard thickness. Sometimes 4/4 rough stock is on the heavy side and will measure 1-1/16" to 1-1/8" thick and if the board is relatively flat it may make a 7/8" board; but I don't count on it. I buy 5/4 stock.
What type of a latch is used on the left door of double doors which overlap?
Clarkston, WA
- Arnold
Our Expert
When double doors are used on furniture the left door is held in place by a cupboard catch and the right door is locked the stile of the left door.
I am interested in making glass doors for a Period Corner Cabinet circa 1760. I am looking to purchase the correct set. In using your new set # 55360, will I be able to have space for glazing compound to fasten glass?
Also will this generate a look typical of a furniture piece vs. a window sash? Any suggestions in addition to mine above?
- Bob C
Our Expert
The Amana Divided Light Door set #55360 is designed specifically for making furniture doors. The mullions made with the set measure 3/4" wide and the set uses true mortise-and-tenon joinery. A rabbet on the back of each "light" provides plenty of space for glass and glazing putty.
I want to make for a two door cabinet without a center divider, full overlay doors, but don't want to have a gap between them (to keep out dust). Is it possible to make overlapping doors for this overlay style?
- Ron
Antioch, CA
Our Expert
Yes, the solution is to cut a rabbet along the length of the overlapping door stiles. The rabbet should be cut on the interior edge of one door and the exterior edge of the mating door. For decorative purposes a bead is usually cut along the edge.
To cut the rabbet, I recommend the Amana Tool #49300. To cut the bead I use the Amana #54162.
How do you attach a base molding on casework without creating cross-grain construction problems?
- Don
Spring, TX
Our Expert
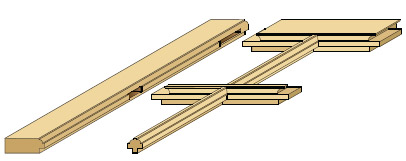
Base molding, such as the Amana no. 49217, should always be mitered at the corners. The front piece of molding can be glued to the case. The side pieces, sometimes called returns, are glued at the miters and to the case for the first few inches. The remainder of the return is nailed to the case with small brads.
Another method is to attach a mortise-and-tenon frame to the bottom of the case. The frame should be slightly less in thickness than the height of the base molding. This allows the molding and feet to be attached to the frame without the cross-grain construction issues.
I am just about finished with my first keeping box. It is turning out nice, but I am a little disappointed with the moldings on the box. I have your books on Period Details and The Router, so I have great info on making moldings. My question is about the size or the scale of the moldings. What size router bits would you recommend for a box that is made out of 1/2" material?
- Duane
Farmington, MO
Our Expert
Proportions are one of the keys to creating an attractive piece of furniture. The thickness of the box is not as important to the molding size as the overall height and width. I've found that the best method for sizing moldings, feet, carvings and other decorative elements is to first create a full scale drawing. Because moldings are mitered, they appear larger when viewed from an oblique angle. Once I'm satisfied with the drawing I'll often make a mock-up to ensure that the proportions are pleasing when the object is viewed from various angles.
I'm a long time fan and have several of your books and articles, that I constantly reference. But now I'm kinda stuck! I'm currently in the planning stages of a set of sofa tables that feature post and panel construction. In the past I've either used plywood or frame and panel construction when joining front and sides to vertical posts. Or when using solid wood simply oriented the grain properly and used the appropriate joinery.
I plan on using vertical grain posts with relatively wide,13", bottom rails. Usually, cross-grain construction is a recipe for disaster but I've seen similar type of construction on older period pieces (Queen Ann Low Boy) for example that hasn't exploded (yet.) I've read where you have wrote that multiple mortise and tenon can help distribute the stress allowing the solid panel to flex rather than crack or split. I was wondering if you could elaborate on why this is so and if I can safely use this method? Thank's. You Rock and your Ball and Claw feet I will never get the hang of!
- Bob
Marengo, OH
Our Expert
Post and rail construction is a common furniture technique in which case sides are mortised into the legs, or posts. This type of construction is strong because of the deep mortises and long tenons used. If the case sides are wide, as in many dressing tables for example, the wide stock can crack when the relative humidity drops during cold, dry winter months. And some woods, such as maple, move much more than others when the seasons change which can make the problem worse.
There are a number of solutions depending upon the design of the furniture piece. However, one solution is to leave one or more of the mortise and tenon joints dry which will allow the wood to expand and contract. Instead of using glue the joint can be held together by driving a wood pin through the joint. First assemble the joint, drill the hole for the pin, pull the joint apart and elongate the hole in the tenon. When you drive the wooden pin into the joint the elongated hole will allow the tenon to move while keeping it tightly assembled.
The top of my dressing table is 7/8 inch thick. I would like to use your thumbnail table edge router bit No. 49563 for the top edge profile, however it appers to be designed for 3/4 inch stock. Can I use this bit without a problem or is there a bit with the same profile available for 7/8 inch stock? Thanks for your help
- Lou
Stony Brook, NY
Our Expert

Amana bit no.49563 is designed for 3/4" thick tabletops and will not work on a thicker top.
I suggest that you consider reducing the thickness of the top. While it's not unusual to use a 7/8" thick for a dining or kitchen table, it is some what thick for a dressing table. Dressing tables are smaller in scale than many other tables in the home and you may find that the thicker top appears disproportionate to the rest of the furniture piece. Even traditional Chippendale dressing tables, which have heavier proportions than their Queen Anne counterparts, often emphasize the top by add
ing a moldings under the top. This is different however than a thick top because the molding provides a transition.
Hello I'm finishing up my Grandfather clocks project. I have a question about wood movement and grain. I used 18" wide Curly Maple boards for the base. The grain is running horizontal. I'm making the back in 2 pieces. The bottom is running horizontal like the other 3 sides of the base. I did this thinking they would move in the same direction and hopefully not crack. Should I screw, nail or glue the back on?
- Lou
Jaffrey, NJ
Our Expert
The back on old tall clocks (grandfather clocks) is typically nailed on. Nails will allow for a small amount of seasonal wood movement and as long as
the grain in the back is parallel to the rest of the stock there should not be a problem.
I am working on a slant top desk made of cherry. The slant top portion is 22" wide and 19" deep. The case is 13/16" thick. I am redoing the top. I am not happy with the first one. What would be a good thickness for this desktop? I'm thinking something less that 13/16 would be more visually pleasing and easier to lift. I would send a picture if possible! It will have two butt hinges at the back.
- Brent
Jefferson City, TN
Our Expert
When constructing full-scale furniture casework such as chests and desks, the stock thickness is typically 7/8". This it common to allow room for dovetail joinery and to help prevent the warpage that can occur on thinner stock.
I don't have a photo or drawing of the desk but I suspect that 13/16" to 7/8" should look fine. If the surface that your talking about is truly a top, then you may want to reduce the visual thickness by shaping the edge with a simple profile such as the Amana no.49402. If it is the fall front that you're speaking of, it is typically rabbeted to create a lip which overlaps the edges of the desk sides. In this case the rabbet will help to reduce thickness.
My hand-cut dovetail skills are between intermediate and advanced, however I spend far too much time laying them out. On any given board width where is the best starting point to begin measuring so that everything comes out even and result in little or no waste?
Thanks in advance for any help you can provide.
- John
Calgary,Canada
AB
Our Expert
 Most dovetail joints (but not all) begin and end with a pin. This strengthens the joint by locking the corners securely. To layout adovetail joint, I begin bymarking the locations of the half-pins at each corner. Then I use dividers to step off the pins. Each step of the dividers is the centerline of a pin. After marking the centerlines I mark the slope on each side of the centerline to complete the layout.
I'm building an 18th century style desk. The desk interior has pilasters on either side of the center door. Does Amana have a bit for shaping the base and capital?
- Dan
Durham, NC
Our Expert
Fluted pilasters flanking a center door were a common feature on desks from the 18th century. A study of desks from the period will reveal a lot of variations on this popular design. I use small core box bits such as Amana #45902 and #45904 to shape the coves. To shape the beads I use beading bits #54163 and #54160.
Several months ago I e-mailed you with some questions about building a pencil post bed. You suggested making the posts myself instead of buying them, saying they were not that difficult or time consuming to make. I took your advice and you were right. I have all of the pieces to the bed made and am ready to sand and finish. My question is, should the mortise in the two posts holding the headboard be a little longer than the headboard itself to allow for expansion? Currently, it is a snug fit.
Thanks for the encouragement, this has been a fun project to do and I have surprised myself with the quality of the piece to date. Working with curly maple has been a challenge to say the least. Thank God for scrapers.
- Chris
Three Rivers, MI
Our Expert
I'm glad to hear of your success! You have the right idea, the headboard needs to be free to expand and contract with changes in the seasons. I suggest that you lengthen the mortise by 1/8" to allow for movement.
I am interested in making a craftsman style table with "Quadralinear post construction" for the legs. I have a shaper with a 1.2" tilting spindle.
Would it be possible to construct the locking miter joints for the legs using a glue-joint cutter such as the Amana-61268?
Or, is it necessary to use an actual Locking miter cutter head?
Your advice is greatly appreciated.
- Richard
Lafayette, CA
Our Expert
Craftsman, or Arts and Crafts, style furniture uses quartersawn stock which displays the ray figure in oak.
To create the most pronounced figure in square stock such as table legs, woodworkers often join four pieces of quartersawn stock. Although a simple miter can be used, a lock miter makes alignment an
d glue up easier. You'll need to use either the Amana no.998 shaper cutter or one of the Amana lock miter router bits such as the no.55389. The glue joint bit will no
t work for this cut.
Also, the strips of stock for table legs are relatively narrow. When routing, use featherboards to hold the stock and a push stick to distance your hands. If the joint is cut on a shaper a power feeder is required.
How did you inset (mortise) the desk lid hinges with the round ends? If you used a router bit, what was the diameter? Lastely, what was your source for the hinges you used?
- Garold
Wisconsin Rapids, WI
Our Expert
Actually, 18th century style desks use hinges with square corners. In other words, the ends of the hinges are not rounded. You can find period hardware from several sources on-line.
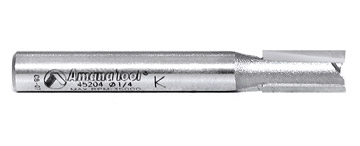
To mortise for the hinges I use a 1/4" diameter straight bit such as Amana Tool no.45204.
To cut the mortise, I place the hinge in position and outline the leaf with a marking knife. Then I route close to the layout lines and finish the mortise with a chisel.
The application I'm working with is applying a beaded edge treatment to cabinet face frames that include a curved arch in the face frame.
Cutting a 3/8" diameter bead on the concave curved face of a gently arched face frame has me stumped. The only option I have used so far is a beading router bit on a shaper for the straight vertical elements and using a hand beading tool to cut the bead on the face of the curved elements. I haven't cut any miters where the vertical elements meet the curved arch of the face frame, instead I use carving chisels on the vertical elements to make the profiles meet at a simple butt joint held with pocket screws. I stop the beading on the vertical elements a bit short of where they meet the arch to leave room for carving a corner in the beading.
Are there any other options that can make sense for the small shop to shape the edge and/or to join the arch to the vertical elements, perhaps with a small miter at the bead?
I'm using 3/4" poplar with a sprayed oil paint finish.
- Jim W.
Hammond, LA
Our Expert
Curves in furniture and cabinets always present a challenge, especially when the curve has a shaped molding profile.
Here are three methods that you can choose from:
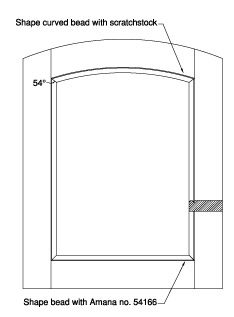
1. Shape the bead on a shaper with Amana shaper cutter no.974. To shape the bead on curved stock you'll need to construct a fence with a curved base to support the stock. The radius of the curved base is the same as the outside radius of the curved rail of the faceframe. This method is illustrated on page 194 of my book "The Complete Illustrated Guide To Shaping Wood".
2. Shape the straight sections of bead with Amana no.54166 corner bead router bit and shape the curved bead with a scratch stock. You can purchase a scratch stock but it is very easy to make your own with an offcut and a piece of steel scraper.
3. Shape the bead and bend it to match the curve. If the radius is broad a 3/8" stick should easily bend. If not, you can steam it first. You can shape all of the beads with the Amana router bit and steam bend the curved bead. Steam bending is quite easy but you'll need to follow a few guidelines for a successful bend: Select only straight-grain stock that is completely free of knots or runout; the stick will break at a knot or split at the runout when you attempt to bend it. Small sticks, like this 3/8" bead, require about 30 to 45 minutes of cooking in a steam box. You'll have less than a minute after you pull it out of the steam box to bend it. After that it will have cooled too much to bend without breaking. Fasten the stick into the form and allow it to cool and dry. Then glue it to the curved rail. For more details on steam bending see my book that I mentioned above.
The beaded frame members can be mitered at the corners on a tablesaw. This is illustrated on the Amana website under "Articles", "Constructing a Beaded Face Frame. Keep in mind that the miter at the curved rail will not be the typical 90 degrees. You'll need to draw the curve full-size to find the miter angle.
This sounds like an exciting project and we would certainly enjoy seeing a photo of your finished work.
I built the chest of drawers you featured in Popular Woodworking in 2005 and it came out pretty good. Now I would like to build a similar-looking dresser. Never having built one my question concerns the construction. Would I be able to use the same techniques you outlined in your chest of drawers or would I have to do something different?
My plan is to make the dresser 58" from side panel to side panel, with three smaller drawers across the top, about 4" deep, then six drawers under that in graduating sizes, from about 8" on the bottom row, 6-1/2" for the next row and 5-1/2" for the third row. I'm concerned about strength across the 58" width, assuming all the drawers will be full. I would appreciate any advice or direction you can give me along this line. I really admire your work and I'm so pleased with the chest of drawers. If I can get this dresser built, the two should go very nice together.
- Joe W.
La Luz, NM
Our Expert
f9bf0f82.jpg)
Thanks for your compliments; it's always a pleasure for me to know that people are enjoying my articles.
You can certainly use many of the construction techniques from the tall chest to build a dresser. Here are a few suggestions to keep in mind:
-Traditional chests-of-drawers, like the one in my article, are tall and narrow.
-Dressers, which are a relatively modern design, are short and wide. This causes the drawers to be short and wide, too. A wide drawer will
more easily rack and bind as it is closed. I suggest that you add vertical dividers to the drawer openings. This will provide support to the horizontal dividers to prevent sagging (58" is a long span). It will also reduce the width of the drawers and help prevent the drawers from binding during use.
-Make the top as overhang the case and shape the edge of the top with Amana Tool No. 49555.
-You can rout the dovetails using Amana Tool No. 45852