
I have purchased the 4 bit Amana goose neck set. I will be useing a scroll board with a seperate goose neck molding built out and on top of it. I am unsure of what size stock (width and height) to use for the molding itself.
-FIGNASTY
Bethalto, Il
I have purchased the 4 bit Amana goose neck set. I will be useing a scroll board with a seperate goose neck molding built out and on top of it. I am unsure of what size stock (width and height) to use for the molding itself.
-FIGNASTY
Bethalto, Il
Our Expert
To create the full depth of the profile using the Amana bits you'll need stock 1-1/2" thick. The length and width of the stock will be determined by your furniture design. I suggest that you draw the goose neck molding full-size to determine the stock requirements.
How would you suggest cutting this cornice molding? I was thinking of using one piece of mahagony, using a router bit for the ovolo shape, a shaper cutter for the "rabbet" cut, and a custom insert cutter for the lower cove and bullnose. I have the first two cutters, but not the third. What would you recommend? Thanks very much
-Dick
Houston, TX
Our Expert
Amana ProfilePro shaper cutters use a pair of insert cutters that lock into the cutterhead. For a custom profile I recommend that you purchase the available blank knives and have them custom ground at a local sharpening shop.
My client is missing picture rail molding in various sections of her living room. Approximately 15' in total. Some sections are only 6" and the largest being 6'. I can assume the smaller sections where taken as samples from prior contractors that came up empty.I would like to re-create her existing picture rail molding. What is the most affordable way to go about this project. I am skilled with a router. But I have been reading about CNC. Any thoughts are greatly appreciated.
-Al
New York, NY
Our Expert
Sometimes you can duplicate a unique profile by taking multiple passes with several different profile bits. However, even with all of the available router bit profiles I find that it's still sometimes necessary to opt for custom tooling.
Custom brazed router bits are expensive but may well be worth the cost if the tool can be used again for future jobs. A less expensive alternative is to use insert tooling such as the Amana Profile Pro. This shaper cutter uses less expensive high speed steel cutters and blank cutters are available for custom grinding. You can take the cutters to a sharpening shop along with a drawing and have the cutters ground.
Computer controlled routers (CNC) are very fast and ideal for a production shop. With the right router bit, such as the Amana Multi Purpose Profile CNC router bit #RC-2360 and creative programming a number of different shapes can be created. This router bit can also be supplied with special inserts that can be ground to your specifications.
I'd like to make a large crown molding for a piece of furniture. However, as you can see from the drawing of the molding, it seems impossible to shape with router bits. The bit shanks are too short and the profiles face the wrong direction. Is there a method that I can use for shaping this large molding with my router table and an assortment of bits?
PS - I have used Amana bits almost exclusively and am very pleased with the outcome.
-Jim P.
Ooltewah, TN
Our Expert
 The key to shaping large furniture crown molding is to shape individual pieces of stock and then stack them. If the seams are located on the inside corners they will not be noticed in the finished piece. This method is also less expensive than purchasing large, heavy stock.
Traditional furniture moldings are made up of simple profiles such as coves, thumbnails, and ogees. I use the tablesaw to cut large coves and then use router bits for the smaller profiles which flank the cove.
Router Bits used in the illustration.
Round Under Router Bit No. 57138
Corner Rounding Router Bit No. 49506
Roman Ogee Router Bit No. 49206
I am looking for an effective, accurate method for placing a 1/4" bead at the bottom edge of a compound curved table apron. In the past I have hand carved such beads but the results leave much to be desired. Can you reccommend a more effective way??
-Bill J.
Andalusia, AL
Our Expert
One of the most effective and accurate tools for shaping a profile on a compound curve is the scratch stock. This simple shop-made tool is just a stick of wood equipped with a profiled scraper. A convex curve on the end of the stick will allow the scratch stock to follow the contours of the table apron; a piece of thin steel from a card scraper or old handsaw works well for the cutter.
I'm making a small "keepsake box" and I need scaled-down moldings. Can you suggest some bits? Also, what would you recommend for an easy yet attractive finish for a walnut keepsake box? I have no experience with finishes.
-Peggy S.
Rochester, MN
Our Expert
![]()
Amana has a wide selection of router bits for shaping furniture moldings of different sizes. For a small box I suggest Amana Tool no.54137 for a base molding, no. 54187 for a trim molding above a row of drawers, and nos.54125 and 49509 for shaping the edge of a lid.
For an easy, beautiful finish for walnut I suggest a coat of wiping varnish followed by several coats of 1lb amber shellac. The oil in the wiping varnish will add depth and the shellac will warm up the cool colors of the walnut. I rub between coats with 0000 steel wool and apply a coat of wax over the final coat.
I will be making a entertainment center that has some gooseneck moulding . I will be purchasing the correct Amana bits to do this . But, this project has 2 pieces of curved or radius moulding that I will not be able to lay flat on the table and cut the profiles using the gooseneck bits. They will have to be shaped with the work pieces at 90 degrees to the router bits. Is this possible? Can I have some bits made to do this? I have talked to a tooling place that makes router bits and they said yes. Are they correct? I sure hope so! All machining will be done on a router table, with a variable speed router.
-Donnie
bardstown ky 40004
Our Expert
Most any crown molding profile can be shaped on a radius or gooseneck curve. Radius crown is typically laminated to avoid creating weak, short grain. The
curve of "S" curved, sometimes called gooseneck, molding is usually bandsawn from wide stock.
After creating the curve, the molding profile is shaped with router bits, shaper cutters, and/or carving gouges depending upon the size and complexity of the profile. I will be glad to help to determine the best approach, however, I'll need an accurate drawing of the molding profile.
A friend of mine wants some help in making a jewelry box with a cove cut on all four sides. In "Shaping Wood" on page 210, you show what looks like a large cove bit and talk about using several cuts to shape a nice elliptical cove. However, the cove bits I have all have a guide bearing on the top, so I assume that one has to remove the bearing and cut off the post to use a cove bit in the manner demonstrated on this page. Is this true, or are there other and more applicable bits that I do not have
I did try a "demonstration" piece using the table saw as shown on page 209, but with my saw is hard to clamp a highly angled fence, so I was hoping there was a way to do this on the router table or a shaper.
- Don
Flagstaff, AZ
Our Expert
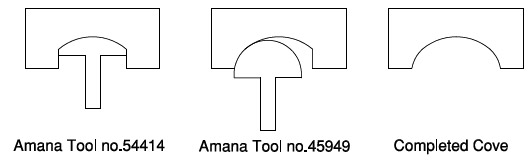
Cove router bits use a bearing to guide the cut and shape one-quarter of a circle. If you want to shape a semi-circular cove you can use a core-box bit. Amana offers a wide assortment of core-box bits from 3/16" radius to 1-1/8" radius. To shape a larger cove you can combine the cuts from a core-box bit with the Amana Tool Crown Molding bit no.54414.
Begin by making several passes with the crown molding bit. This is a large bit so use a table-mounted router and make light passes. After reaching the required depth you can complete the sides of the cove with a large core-box bit such as Amana Tool no.45949.
I need to reproduce (or as close as possible) moldings for an old house I am restoring. The molding profile contains three elements, a cove, a bead, and another cove. It looks like bit #54104, with an additional small cove sitting on top and slightly back. The overall dimension of the profile is 7/8" highand 1" deep
Do you have any tips for making this with standard bits and multiple passes, or will i need to get a special bit made?
- Ron
Flanders, NJ
Our Expert
Complex moldings are typically made by combining simple profiles such as coves, roundovers, ogees, etc. You can probably create a close reproduction of the molding by using three separate bits to shape two strips of molding. After shaping stack the molding to create the finished profile.
Recommended router bits for this project.
Amana Tool 49094 & 49110 - Cove router bits
Amana Tool 49610 - Beading router bit
Do you have any tips on how to do the piecrust pattern with a router. Carving is not a skill I've accomplished.
Thanks.
- Chris
Bridgnorth
Our Expert
The piecrust pattern is a beautiful profile found on the edges of many 18th century tea tables. Because the piecrust has sharp, distinctive inside corners it cannot be created with a router. A true piecrust must be carved.
However, you can create a dished tabletop with a router. Although it isn't as distinctive as a piecrust, a dished top is still very attractive. I've illustrated the router bits required for a dished top. For information on constructing a router jig please look at pages 143-144 of my book The Complete Illustrated Guide To Shaping Wood.
Recommended router bits for this project.
Amana Tool 45505 - Mortising router bit
Amana Tool 45904 - Core box router bit
Amana Tool 49701 - Round over router bit
Click here to view Illustration of a Dish Top
I have decided to decorate the ceiling of my drawing room by applying chair rail type of molding flat on the ceiling. The georgian style I am after asks for some portion of the molding to be curved. Is it better to saw curved pieces of wood and route the profile on them (to make my own molding) or take a straight molding and do kerf bending (I will have to fill the voids with putty and apply paint after)?
-Michel L.
Montreal, QC
Our Expert
You can laminate the curve however, the easiest method for making a curved molding is to bandsaw the curve and shape it afterwards. Although a laminate will be stronger strength is not critical because the molding is non-structural.
Start by using a compass to draw the radius of the curve on 1/4" plywood. If your compass is not large enough make a simple trammel with a stick. Drive a nail in one end of the stick for a pivot point. On the opposite end drill a small hole for a pencil.
Next, bandsaw the curve and smooth the edges of the plywood. It's important that the curve is free of bumps or dips; it will serve as both a pattern for tracing the stock and a template for smoothing the stock.
Trace the pattern onto the workpiece and carefully bandsaw the curve. Now fasten the pattern to the workpiece to serve as a template for flush trimming. Flush trimming will quickly remove the bandsaw marks and smooth the curve. Finally, shape the profile along both edges of the molding.
I'm trying to learn how to make different molding profiles both large and small for furniture. I was told in a woodworking store to combine different router bits to achieve this. I use a router table with a 3 1/2 hp Porter Cable router mounted in it. Will the book "The complete Guide to Shaping wood" cover this? Is there any other sources you can recommend.
-Mark J.
Prescott, AZ
Our Expert
You can shape large, complex moldings with your router by combining the profiles from several bits. I begin by drawing a sketch of the molding then I break it down into simple profiles. After routing the shapes on separate
pieces of stock I stack the layers to create the molding.
Very excited to get started on the Chest of Drawers that you detailed in the most recent issue of Popular Woodworking. The only spot that I'm a little leery of is the crown molding. You mention you ran it over the router table several times to get your profile. I'm wondering if you could either tell me or publish just how you did this (ie. which router bits, what order, depths, etc...)? I've never made my own moulding like this before and I'm afraid I'd spend forever trying to figure it out not to mention waste a whole lot of wood! Thanks and might I compliment you on a very nice looking plan as well.
-JCL
Corrales, New Mexico
Our Expert
You can shape large, complex moldings with your router by combining the profiles from several bits. I begin by drawing a sketch of the molding then I break it down into simple profiles. After routing the shapes on separate pieces of stock I stack the layers to create the molding.
My question is that the office desk is rounded off at the end and the leg which supports the desk will round together with the desk now I want to put on it molding to give it a richer look how can I make my molding become flexible.
-Shlomo C.
Our Expert
You could create the curve using a bent lamination or you could saw the curve from solid stock. With either method it's best to shape the molding profile after the curve is created. Sawing a curve creates weak "short grain". This method may not be practical depending on the radius of the curve and the length of the molding. To make a bent lamination you'll need to first construct a bending form with a radius that matches the top to which the molding will be applied. If possible, the easiest method is to shape the molding profile on the edge of the curved top.