Cabinet Doors & Drawers

Raised Panel Doors?

Although this isn't my first time making raised panel doors with cope & stick joinery, I am still learning it. I recently purchased the Amana 54116 panel cutter for its small profile. I am struggling to figure out how the small tongue it creates is supposed to fit into the 3/8" deep groove in the rails & stiles. If I use that bit deep enough to create the 1/4" tongue, then it fits in very shallow, This also makes the panel face stand proud of the R & S face. I prefer that the panel face is flush with the R & S. however it does not have too. That is just my personal preference. I thought about back cutting the panel with a straight bit, but this still seems to not get me anywhere besides flushing the panel face to the R & S. What part of this am I just not understanding? 


Preston, MD

-John

Our Expert

Amana Tool raised panel bit no. 54116 features a small profile which is ideal for scaled-down doors. It works best on 9/16" thick stock which will provide a 1/4" thick edge and a 1/16" fillet, or step around the perimeter of the field. This panel profile works well when used with no.55421 2-piece stile-and-rail set and 3/4" thick frame material. This will place the panel flush with the face of the door frame.

Kitchen Cabinet Doors

I HAVE THE AMANA RAISED PANEL SET, BOTH Timberline® TRS-260 & Amana Tool® AMS-201 I HAD NO PROBLEM CUTTING THE STILES & RAILS. I WOULD LIKE TO NOW CUT THE TRADITIONAL RAISED PANEL INSERTS. I HAVE A SHOPSMITH WITH ALL THE ATTACHMENTS. THANK YOU FOR ANY HELP YOU MY GIVE ME!

Valley Stream , NY

Our Expert

Whenever you shape raised panels with a router table there are some things to consider: 


-Don't exceed the recommended RPM of the bit.

-Use only flat stock that is free of warp or twist
-Always feed the stock against the bit's rotation. Don't climb cut.
-Take several passes rather than one heavy pass
-Always use panel-raising bits in a table-mounted router. Never use in a hand-held router
-For the best results always shape the end-grain first followed by the long-grain
-Use a guard

Mission style flat panels?

The end panels are made separate and applied they are approx. 29.25T x18.5w. What size should the stiles and rails be?


Sherrard, Il

-Robert

Our Expert

Judging from the size of the panel, the stiles and rails would look balanced at approximately three inches wide. I suggest that you make a full-sized sketch to determine the exact size before cutting the stock.

Tall shaker cabinet?

What is the bevel in degree's of shaker doors? I am confused? is it 8, 15, 20, or 22 1/2 ? thank you for your help. 


Auburn, KS

- Tom

Our Expert

Like all details in hand-crafted furniture from the past, there are variations among surviving pieces of furniture. As a rule-of-thumb, the degree of bevel found on the doors of Shaker furniture is short and relatively steep. 

Roll top desk?

I am interested in using your tambour router bit set in a roll top desk project. I have not finalized on my plan selection, but I do want to make the desk large. I have seen widths of 56", 62", and 68". Is there a maximum length to the tambour when using the Amana set of bits.


Alliance, Oh

- Chuck

Our Expert

We suggest that you limit the length of the tambour to 60 inches. Longer lengths may sag because the tambour strips are supported only at each end.

Beaded Face Frame for Kitchen Cabinets

Could you please tell me how to bet way cut and join a beaded face frame for cabinets. I am planning on buying the Hoffman beaded frame set but it too expensive for just cutting joints for frames, any ideas please?


- Jason

London

Our Expert

A beaded faceframe on furniture or cabinets is a sign of quality. It is a fine detail that takes time and craftsmanship to properly execute but it is certainly worth the extra effort.


Beaded faceframes are also a great way to show off inset doors. Unlike an overlay door, an inset door fits inside the faceframe and must be carefully fitted with a hand plane. The precision of the fit adds to the quality and fine craftsmanship of the cabinet.


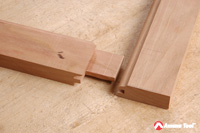
The strongest way to construct a beaded frame is with time-honored mortise-and-tenon joints. After the joints are cut the bead is shaped on the rails and stiles and then mitered at the corners where the beads intersect.


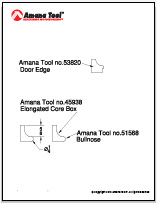
Amana makes a complete line tools for this technique including corner beading bits in sizes from 1/16 to 3/8 radius so that you can select a bead that is in proportion to the work that you're doing. For example, for the corner cupboard in photo A, I used a 1/8" radius bead, Amana Tool corner beading no. 54162. For the sample in the photo essay I used a 3/32" radius bead, Amana Tool corner beading router bit no.54163.


Here are the steps to beading a frame:

STEP 1
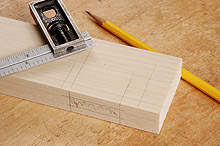
Lay out the mortises. --Keep in mind that the mortise must be offset on the inside corner to allow room for mitering (see illustration). The offset is equal to the bead plus the quirk, or groove behind the bead. For example, the 3/16" diameter bead that I used has a 1/16" wide quirk. So the offset is equal to 1/4". Outside corners should be haunched to avoid weakening the frame.


STEP 2
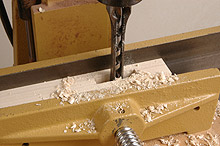
Cut the mortise—I cut the mortises with a Timberline no.609-120 3/8” hollow chisel. Keep in mind that the mortise must be cut 1/4” deeper than desired. Later on, when the 1/4" wide bead is mitered and cut away, the mortise will be the correct depth.


STEP 3


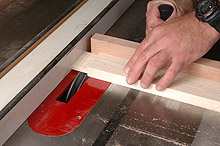
Cut the tenons—before cutting the tenons I cut the rails to length. The rail length must be increased by two times the width of the bead; this compensates for the loss of the bead at the mortises. I cut the tenons on the tablesaw with an Amana Prestige stacking dado set. The miter gauge guides the stock at ninety degrees and the fence on the saw limits the length of the tenon.


STEP 4
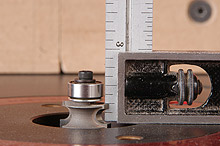
Mount the Amana Tool corner beading router bit no.54163, 3/16” beading bit in the router table and set the heightprecisely to 1/4"


STEP 5
Shape the bead—shape the bead on the inside edges of both the stiles and rails


STEP 6
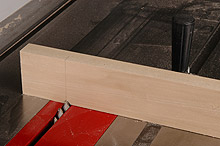
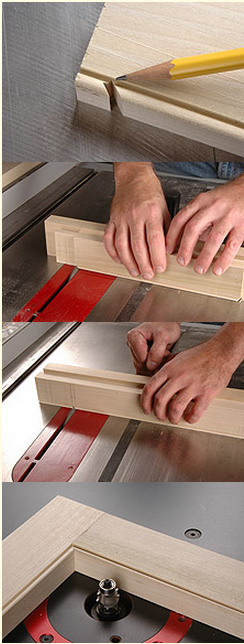
Set up for the miter—the miters are cut on the tablesaw using the miter gauge at ninety degrees and the blade angled to forty-five degrees. A line on the backing board attached to the miter gauge is used to align the stock for an accurate cut. I use the Amana Prestige saw blade for mitering the bead; it cuts smooth without burning or splintering.


The first step is to tilt the blade to 45 degrees. Then adjust the height of the blade so that the tooth tip just touches the edge of the quirk


STEP 7
Miter the rails—align the shoulder of the tenon with the layout line on the backing board.


STEP 8
Miter the stiles—align the inside edge of the bead with the layout line on the backing board.


STEP 8
Remove the bead at the mortise—cut the excess bead from the stile at the mortise and assemble the frame


Kitchen Cab Doors?

On cope and stick doors, if you want to add a chamfer or door pull lip all the way around the door, do you recommend this be done before the door is assembled or after? Also, I know you favor a lipped style door. What profile did you use in your kitchen?


Antioch, CA

-Ron

Our Expert


Amana offers several door edge profiles such as no.49534.When using a profile around the perimeter of a door it's best to wait until after the door is assmebled. If necessary, you can trim the edges where stile and rail meet before shaping the profile.

I like inset doors and lipped doors because they look more like a furniture door. To creat a lipped door I rout a shallow rabbet around the door perimeter with Amana no.49360. Afterwards, I shape a 3/16" radius "thumbnail" profile with Amana no.49502 corner rounding bit. When the door is closed all but 1/4" of the door thickness will be inside of the cabinet.


Entertainment Center

I want to make raised panel doors using the trs-250 router bits.  Never done this before.  Any tips on making doors correct size?  They will vary in overall sizes.  Do I run stock through face down?  Should this be done in multiple passes or is it ok to do in single pass?


-Don C.

North Liberty, IA 

Our Expert

For an entertainment center I recommend that you use an overlay type door with a European hinge. Before starting the door construction process purchase the hinges. This way you can size the door to fit the requirements for the hinge. 


When constructing the door the stile-and-rail framework is milled first then the panel is sized to fit within the framework. To determine the overall size of the door measure the opening and add for the door overlap. Next, cut the stock for the frame to size. Stiles and rails for cabinet doors are typically 7/8" thick by two inches wide. It's best to cut the stiles an inch longer than the final size. This way you can trim them to final length after the door is assembled.


The length of the rails is most important; it determines the overall width of the door. To determine the rail length subtract the width of the stiles from the overall width of the door then add back the depth of the cope/panel groove. For example, if the door is 14" wide subtract 4" for the stiles then add 3/4" for the cope at the ends for a total length of 10-3/4". 


With the stock milled to size you're ready to cut the joints. Remember, the bits are for use in a table-mounted router only. Start by shaping the cope at the end of the rails. Use a miter gauge to safely support the stock as you feed it past the bit. Next, shape the sticking/groove along the inside edges of both the stiles and rails. Remember to use a push stick to distance your hands from the bit.


After shaping, dry assemble the door and measure for the panel. To determine the panel size measure the opening in the frame and add 1/2" to both the length and width. This measurement allows the edges of the door to extend 1/4' into the frame groove. Remember, the groove is 3/8" deep. The extra space inside of the groove will allow the panel to expand during the humid summer months.


The panel is shaped face down. To shield your hands from the spinning bit I recommend the Panel-Loc barrier guard. Besides providing protection for yourhands it also works as a hold-down to keep the stock firmly against the table while routing. To avoid splintering the end grain of the panel shapethe ends first, then shape the edges. Depending on the hardness of the wood and the size of your router it will take three to five passes to reach the full profile depth. The panel edge should fit snug within the groove in the frame; this will prevent the panel from rattling when the door is opened. 

Drawers

I just bought an Amana drawer lock router bit. I've never used one before. Do you have any set up instructions or helpful techniques?


-Craig G.

Our Expert

Raised panel router bits are available with or without a back cutter. The back cutter ensures that the edge of the panel will precisely fit the groove in the frame, even if the panel is thicker than the standard panel thickness of 5/8". Panel cutters without a back cutter work well, too. But the setup is somewhat fussy; you must precisely adjust the height of the bit for a good fit in the frame groove.


Cope-and-stick bits allow you to quickly and easily make stile-and-rail doors for furniture and cabinets. There are two basic types, reversible and two-piece.


Reversible bits
 are an economical choice because you only need one bit to cut both the "cope" and the matching "stick". However, reversible bits require that you disassemble the bit and re-arrange the parts on the shank for the second cut. Also, the decorative "sticking" profiles on reversible bits are limited to symmetrical shapes that can be inverted to create both series of cuts. Reversible bits are not less precise than other types, they just require time to rearrange the parts.


As the name implies, two piece cope-and-stick sets come with two bits; one bit cuts the cope on the ends of the rails, the matching bit cuts the decorative "sticking" profile while simultaneously cutting a groove for the panel. Two-piece bits cost more but they're more convenient because you don't have to stop and rearrange the bit. They're also available in a wider choice of profiles.


Amana has developed a unique style of cope-and-stick set which works with the undersized plywood that is so common today. The new Instile & Rail System™cope and stick bits use shims which allow you to adjust the groove width to the thickness of the plywood. Instile and Rail bits solve the annoying problem of panel rattle when using plywood door panels. 

Dresser Doors

#1 - I was told by an Amana expert that when I buy a raised panel cutter I should buy one with a back-cutter.  Exactly why is this best for this application?  Also, I will be buying the large type for flat routing on a table.

#2 - Is a Reversible stile & rail assembly less precise a bit than, say, an instile type bit?


-Darrell M. 
SAN FRANCISCO, CA

Our Expert

Raised panel router bits are available with or without a back cutter. The back cutter ensures that the edge of the panel will precisely fit the groove in the frame, even if the panel is thicker than the standard panel thickness of 5/8". Panel cutters without a back cutter work well, too. But the setup is somewhat fussy; you must precisely adjust the height of the bit for a good fit in the frame groove.


Cope-and-stick bits allow you to quickly and easily make stile-and-rail doors for furniture and cabinets. There are two basic types, reversible and two-piece.


Reversible bits
 are an economical choice because you only need one bit to cut both the "cope" and the matching "stick". However, reversible bits require that you disassemble the bit and re-arrange the parts on the shank for the second cut. Also, the decorative "sticking" profiles on reversible bits are limited to symmetrical shapes that can be inverted to create both series of cuts. Reversible bits are not less precise than other types, they just require time to rearrange the parts.


As the name implies, two piece cope-and-stick sets come with two bits; one bit cuts the cope on the ends of the rails, the matching bit cuts the decorative "sticking" profile while simultaneously cutting a groove for the panel. Two-piece bits cost more but they're more convenient because you don't have to stop and rearrange the bit. They're also available in a wider choice of profiles.


Amana has developed a unique style of cope-and-stick set which works with the undersized plywood that is so common today. The new Instile & Rail System™cope and stick bits use shims which allow you to adjust the groove width to the thickness of the plywood. Instile and Rail bits solve the annoying problem of panel rattle when using plywood door panels. 


Mission Style Cabinets

Could you tell me what would be the best way to make mission style cabinet doors. I need router bits too cut rails & stiles and also the door panels. 

-David M. 

Merrill, WI 

Our Expert

Mission style furniture features plain lines, sturdy construction, and rich, figured quarter sawn oak. Doors stiles and rails are wide and surround a flat panel. 
I suggest that you use Amana's new Instile and Rail Mission Style Router Bit set No. 55438

Cope and stick cabinet doors?

I need a door edge detail that will shape a shallow concave chamfer about 5/8" long on the face and leave a finger pull bead on the very edge. I would like that bead to be about 1/4" . But it seems the 53820 bit allows only a 1/8" bead. Are there any other bits available? Even if it had to be a two step process?


Antioch, CA
-Ron

Our Expert

I've provided a drawing which I believe illustrates what you have described. You can make the profile with two bits, Amana Tool Elongated Core Box no. 45938 and Bullnose no. 51568.

Small raised panel door?

Does Amana have a panel raising bit for small paneled doors? 


Milford, NH

-Peter

Our Expert

Yes, the Amana Tool no. 54118 has a 1-1/16" reveal and the reveal on the Amana no.54116 is even smaller at 9/16". Both profiles are smaller than a typical full-scale panel. Both of these bits are equipped with a guide bearing for shaping arched panels.

Kitchen Cabinets (doors)?

I have a question about the Amana Tool Shaker rail-and-stile bit set and the corresponding raised panel bit:


Can the bit set be used to create a long tenon?


Also, on what piece or Shaker region did you model these bits after? I always thought Shaker would be flat panel.


Great Barrington, MA
-Ben

Our Expert

One of the pleasures of reproducing furniture of a specific style is researching the historic pieces to gather design ideas. When featured in woodworking magazines, Shaker furniture is very plain to the point of being bleak. Hwever, although surviving Shaker furniture is somewhat simple, Shaker craftsmen did use attractive lines and sound proportion to add visual appeal to their furniture. One good example is doors on furniture and built-in cabinets. While the Shakers often used flat panels in doors, they also constructed a surprising number of raised panel doors with a simple "thumbnail" sticking. In fact, furniture examples from Enfield, Canterbury, Mt. Lebanon, Sabbathday Lake and Union village all feature raised panel doors.


The short, steep bevel on the Amana Tool no. 54133 is a good example of the typical panel edge on Shaker doors. The Amana Tool no. 55426 Stile-and-Rail bit set creates a simple 3/8" radius "thumbnail" sticking profile.


If you prefer a longer tenon and a true mortise I recommend using the Amana no.49514 3/8" radius corner rounding bit to shape the sticking and cutting a miter in the corners where the sticking intersects. Here is the link to the mitered sticking article on the Amana website:


Cabinet doors?

I would like to make my own cabinet doors now-raised panel/cope and stick. Could you suggest some classic profiles and also the dimensions of the components to mill? That is, the typical thickness and width of the stile/rail and panel to begin milling with. And how do you size these elements for a given opening in a face frame type cab? 


Thanks.

Antioch, CA
-Ron 

Our Expert

Cabinet doors are typically constructed with a stile-and-rail framework surrounding a "raised panel" (the edges of the panel have a decorative bevel which fit within the groove in the frame). This is a centuries-old construction method that allows the panel to expand and contract seasonally while the outer dimensions of the door remain unchanged.


The stiles run in a vertical direction and the horizontal rails fit between the stiles.


The stock for the stile-and-rail framework is typically 3/4" to 7/8" thick; panels are typically 5/8" thick. These standards have actually been used for centuries and today's router bits and shaper cutters are designed to use these same dimensions.


The width of the stiles and rails on kitchen cabinet doors vary based upon the design and are typically sized from 2" to 3" in width.

Cabinet doors can be designed to fit the cabinet in one of three ways:

1. Flush or Inset--Flush fitting doors must be carefully sized to fit within the cabinet opening. The is a traditional cabinet and door that has made a comeback in recent years and is my personal favorite. To join the stiles and rails I use traditional deep mortise-and-tenon joints. As you can see in the drawing, I add a decorative corner bead to the inside edges with Amana corner bead bit no. 54170 (see the article on the Amana website for techniques for mitered sticking). The no. 54117 traditional raised panel bit completes the look. Although it is labor intensive to fit and hinge inset doors, this style of door is beautiful and worth the extra effort.


2. Lipped--Lipped doors have a rabbet around the door perimeter and when closed, most of the door thickness is inside of the cabinet. This is also a

traditional door and it less work to fit than inset doors. To cut the joints on this door I recommend Amanano. 55439 Mission Style stile-and-rail bit set. The door edges are lipped with the Amana no. 55300.


3. Overlay--Walk through any home center and look at the display cabinetsand this is the style that you will see. Overlay doors are popular because they are quick and easy to install. In fact, an overlay door does not really fit the cabinet opening, it simply covers the opening. However, with the right combination of profiles overlay doors can provide a striking appearance to a new kitchen. For the door in this drawing I recommend the Amana no.55430 Ogee Stile-and-Rail, the no. 49534 Door Edge and theno. 54121 Raised Panel bit. Notice that all three of these profiles are a variation of the classic reverse curve ogee.

As you can see from the three designs that I've offered, by using different combinations of stile-and-rail profiles, raised panel profiles, and door edges the possibilities are virtually endless. And Amana Tool offers one of the most complete lines of door making router bits available anywhere.

Cabinet Doors?

I'm planning on using the Amana #55421 Stile and Rail set for constructing cabinet doors. Does Amana have a bit for shaping a 1/4" radius lip on the door edge?


I'd also like to use the Amana no.55360 Divided Light Door Set for the upper doors. What do you recommend for securing the glass?


Fort Collins, CO

-Larry 

Our Expert

To shape the 1/4" door lip I suggest that you use the Amana no.55300 bit and swap the 3/8" radius cutter with the 1/4" radius cutter on the no. 55421
Stile and rail set
.


When using the Amana no. 55360 Divided Light Door bit set you can secure the glass in the rabbet with wood strips, silicone caulk, or for a more traditional appearance, door glazing putty tinted to match the color of the wood.

Raised Panel Doors?

You mentioned one time a way to get cope and stick doors with a long tenon. Is there a preferred way to achieve the looks of a cope an stick with the strength of a long tenon in the complementary mortise?


Victor, MT

-Don

Our Expert

Amana now has two cabinet door making bit sets which feature strong mortise-and-tenon joinery and coped sticking. Tools no. 47515 and 54175 create a mating cope-and-stick panel door. Amana no .55360 creates a cope-and-stick divided light door. Both products use real mortise-and-tenon joinery for strength.


Still another method is to use a roundover profile, such as Amana Tool no.49514, for the decorative sticking and cut miters at the corners. This is a tried-and-true method that allows you to use real mortise-and-tenon joinery with any sticking profile that you choose. This is also the method that I use at my school when teaching how to construct paneled doors with mortise and tenon joinery.


Vertical Tambour Doors?

I'm making a tambour with vertical slats. However, the slats keep shifting and racking out of the grooves. How can you keep the tambours from racking? Have you run across this problem before? The bits, by the way, are awesome, and the pieces fit together beautifully. Thanks for your response. 


St Helena, CA

-Mac 

Our Expert

I suspect that the tambour slats are too short. Just like a drawer that is too narrow for the opening, the short slats rack and bind. I've tried the slats in vertical grooves and they slide smoothly with little effort.


To calculate the slat length, I measure the distance between the grooves and subtract 1/64". After applying the finish, I apply wax to the groove and to the slat ends.

Doors and Cabinet?

I want to build three layer doors and want to know which router bit set would let me shape the stiles and rails that would fit each other. ie the set that would be the reverse profile to each other.


Bakersfield, CA

-Emilio 

Our Expert

Amana has a number of router bit sets for constructing cabinet doors. The popular InStile sets such as Amana no. 55433 adjust to accommodate undersized
plywood panels. The Amana Two-Piece sets use mating stile and rail cutters and are available in three popular profiles such as the no.55430 ogee. The most economical option is the Amana Reversible Stile and Rail bits such as the no. 55370.

© 2021 Amana Tool Corporation